how to make a line pattern in marvelous designer
Let's get started!
Creating clothing for your 3D character is a difficult task and takes a lot of practice. Fortunately, there are some fantastic tools available to help you speed things up – one of which is Marvelous Designer. It offers a quick and effective way to create 3D garments by simulating the physical properties of two-dimensionally-drawn sewing patterns.

If you are totally new to Marvelous Designer (MD), let me give you a very brief overview of the process:
- Open or import an avatar that serves as a collision object for clothing simulation
- Draw sewing patterns in the 2D window of MD
- Arrange the patterns in the 3D window so they wrap around the avatar properly
- Sew the pieces together in the 2D window
- Simulate and adjust the garment in both the 3D and 2D window
- Add details, continue to simulate, and export the final mesh as an OBJ for further editing
Regardless of the complexity of the garment, this process remains pretty much the same for all clothing created in MD.

What topics are covered in this tutorial?
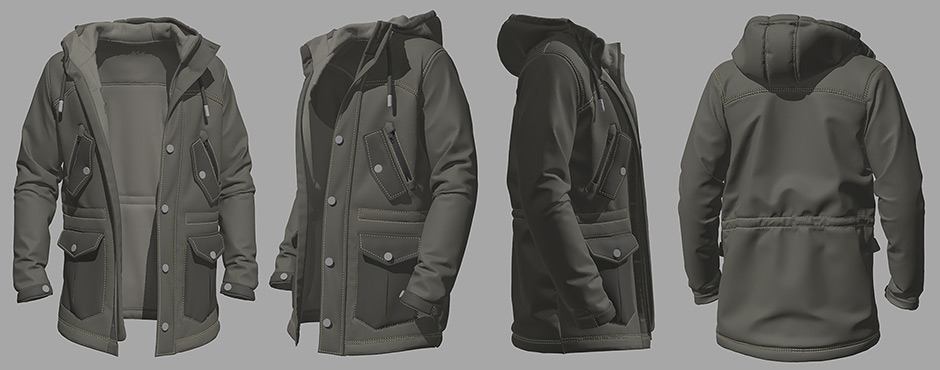
In the following tutorial, I will show you my personal approach to creating clothing in MD by modeling a coat; from importing the avatar all the way to exporting the final garment. This tutorial is divided into 4 simple steps:
- Step 1: What to consider before you start
- Step 2: How to create basic garment quickly
- Step 3: How to add details
- Step 4: How to style and complete the garment
Who is this tutorial for?
Ideally, you will already have some basic knowledge of Marvelous Designer – but if not, don't worry! With a small amount of additional research, you will be able to follow the steps with no previous experience. What's more, you can use the comment section at the bottom of the page if you have any further questions.
Technical requirements:
Any version of Marvelous Designer is suitable for following all the steps outlined in this tutorial. To open the project files, MD version 7.5 is required. All files, including the avatar, are available FOR FREE!
Subscribe to the 3DGladiator Newsletter at the top of the page and you'll receive an email with the download link. If you are already a subscriber to 3DGladiator, please check your inbox, as I'll have sent you an email!
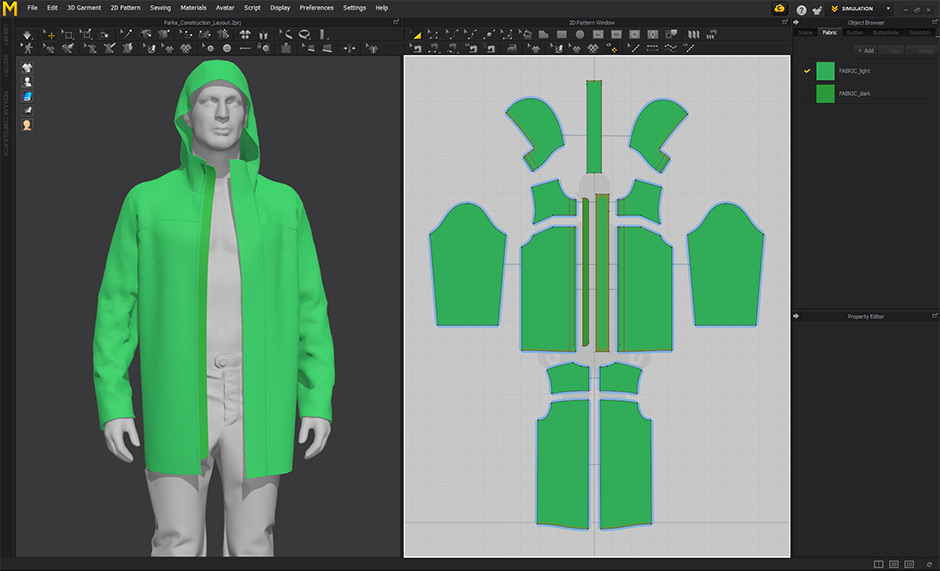
01
What to consider before you start What to consider before you start
In this first step, we'll take a look at what to consider while searching for reference images and how to prepare your own avatar.

Garment Reference Research:
Creating high-quality 3D clothing starts with gathering good reference material. For the MD workflow, you need two types:
- pictures of the actual garment
- images of the corresponding sewing patterns
As appropriate blueprints are often unavailable, sewing pattern images of similar clothing are adequate too.
What you need to know:
- Invest some time finding out how the garment is assembled and what the sewing patterns look like. Take notice of characteristics like fabric type, thickness, and physical behavior.
- Reference images that show the garment worn by a model are very helpful (with open and closed zippers, hands in pockets, different colors in different lighting conditions, and so on). Keep in mind that a lot of realism comes from subtle details. So, be sure to create clothing that allows for the simulation of drapery.
- The MD workflow is built around basic sewing techniques and uses some technical terms that are commonly used in this craft. For anyone wanting to delve deeper into the topic, search for free PDFs about sewing to gain a better understanding of this subject matter.
- The accuracy of the patterns in MD is not so important. As already mentioned, sometimes it's hard to find exact blueprints of the garment you'd like to create. Let's say you're going to build a pair of overalls, but cannot find patterns that look like what you have in mind. In this case, just use the patterns from regular trousers and a shirt and then sew them up. Remember, anything is allowed as long as it looks good!
- MD does a fantastic job of simulating different fabric characteristics, but all in all, it's not perfectly accurate either. That allows us to be creative by adjusting physical properties and coming up with our own unique creations.

What you need to do:
- Assemble and save all patterns relevant for the project and save it as an image file.
- Under Display/Add background image select the image file, approximately adjust the scale and position it next to the avatar in the 2D window.
- In previous versions of MD, this function is not available. In this case, draw a rectangle (S key) and apply the reference image as a texture.

Pro Tip:
Choose a design that allows folding. After all, that's where Marvelous Designer's strengths lie. When the fabric wraps around the avatar like a second skin, there is nothing to simulate and no drapery will be visible.
Preparing the avatar:
For simulation, fabric interacts with collision objects known as Avatars in MD. An avatar can be any mesh imported into MD. For this project, I chose a model from the 3DGladiator library.
What you need to know:
- For realistic results, scale the avatar to its real world size.
- The avatar's mesh topology is not relevant. As there is no symmetry function available in MD yet, it doesn't even have to be symmetrical.
- Avoid collision objects with very high mesh density. I usually decimate the model before importing it.
- When you import your own character model, make sure there is enough space in the crotch and armpit areas to allow for smooth simulation.
- The avatar's feet should touch the ground. You can reposition the avatar in the 3D window any time, but it's best to do that in the beginning.

What you need to do:
- Open MD and import the 3dgladiator_MD_avatar_male_dressed.obj file from the project folder.
- When the Avatar Editor window appears, click the little open icon under bounding volume and load the 3dgladiator_MD_avatar_male_naked_BV.pan file from the project folder. The *pan file contains position and scale of the bounding volumes. I use them to align the patterns to the avatar in the next step.
- Select the avatar, change its color to a neutral grey, and hide the bounding boxes and arrangement points (Shift+F).

Pro Tip:
When you create your own avatar, avoid boring T-poses and add some posture. That results in more natural looking folds.
02
How to build basic garment quickly How to build basic garment quickly
In this step, I'll show you the fastest way to set up clothing in MD and how to avoid some common workflow pitfalls at the beginning of this process.
Main components first, details second:
Our first goal is to create sewing patterns according to our reference image. So let's focus only on the 2D window and forget about simulation or any other fancy MD feature for the moment.
What you need to know:
- Draw the big patterns first and keep it simple. It's not necessary to add details before the main components are in place.
- While tracing the reference image, it's best to already have in mind how you're going to sew the patterns up in the next step. Therefore, you should make sure pattern edges that belong together are approximately the same length.
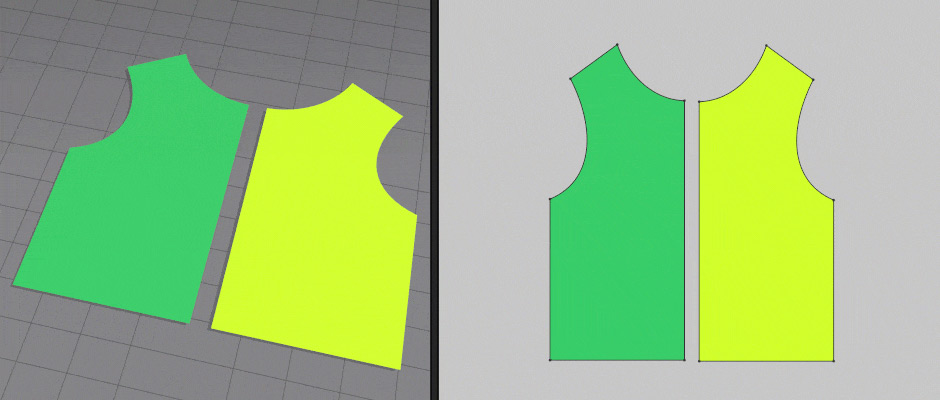
- When you use symmetrical patterns, try to keep symmetry intact as long as possible. This feature comes in handy when you edit the patterns later on. (You can break symmetry by right clicking on a symmetrical pattern and select Remove Linked Editing)

What you need to do:
- First, select the polygon tool and trace the reference image with straight lines. Draw only half of the pattern if it's symmetrical.
- Next, use the edit curvature and edit curve point tools to add curvature. Don't add too many curve points – keep it simple.
- When you're satisfied with the shape, right-click on the pattern and chose symmetric pattern (Ctrl+D). This will result in 2 symmetrical patterns that you can edit and adjust simultaneously. Repeat these steps for all the other patterns in the garment.
Shortcut Keys:
- H = polygon tool, C = edit curvature, V = edit curve point, Z = edit pattern, A = transform pattern
- Shift+T makes the patterns transparent (normally this is used to hide/show 2d textures, but makes the patterns transparent if not textures are applied)
- F12 opens the "Grid Properties" dialog box and let you show/hide the grid in the 2D and 3D window.
Pattern Arrangement in the 3D Window:
When all patterns are drawn in the 2D window, it's time to arrange them in the 3D window and align them with the avatar.
What you need to know:
- Imagine MD's 2D window as a tabletop where you arrange all patterns facing upwards, regardless of how the pieces are arranged in the 3D window. Consequently, flipping the patterns horizontally and vertically in the 2D window, or flipping a pattern's face normal in the 3D window always affects them in either the 3D or 2D window. The following clip makes this clear:
What you need to do:
- Switch the viewing mode from thick textured surface (Alt+1) to textured surface (Alt+2). That makes the front and back side of the patterns in the 3D window visible (dark side = bottom side)
- Select and scale the patterns, so they approximately fit. Use arrangement points (Shift+F) to wrap the patterns around the bounding volumes of the corresponding body parts.
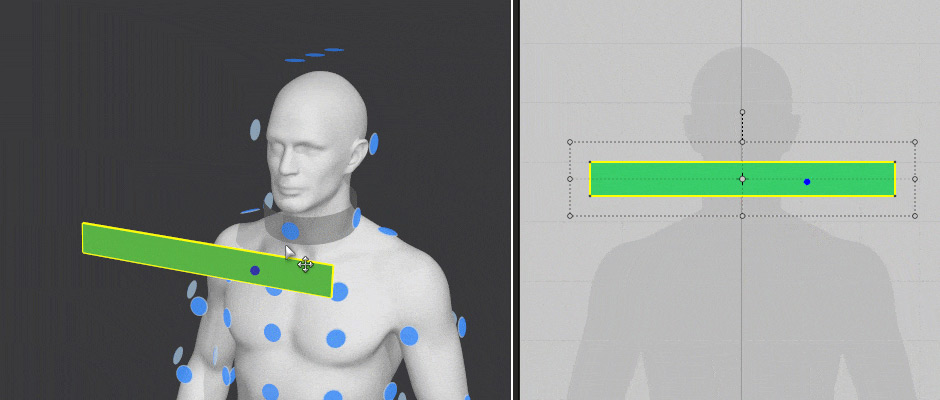
- If you align the patterns manually and without the help of arrangement points, flip their normals or mirror the patterns horizontally to align them correctly.

Sewing patterns and basic simulation:
After the patterns are arranged in the 3D window, you can start the sewing and simulation process to stitch the pieces together.
What you need to know:
- Do the arrangement, sewing, and simulation step-by-step. Place the big patterns first, sew them, and attach smaller patterns like the hood in a second step. Otherwise, it can get pretty confusing.
- For this initial simulation, ignore how the folds fall; just make sure all the pieces fit together nicely. It's not necessary to adjust the simulation properties of individual patterns yet. Leave all settings as they are.
- When you select a pattern in the 3D window, a blue dot appears in the 3D AND 2D window at the exact point you click. Use that dot to keep orientation and to find out which edges belong together.

What you need to do:
- Use the sewing tool (N key) or free sewing tool (M key) to sew the matching edges together. Edit sewing (B key) allows you to adjust the sewing any time.
- When all sewing lines are straight and organized in the 3D window, hit the space bar to simulate and let MD assemble the garment. With simulation still enabled, grab the cloth with the cursor to adjust it.
- If for some reason, simulation produces strange results, stop it, move the pattern slightly away from the avatar, check for twisted sewing lines, enter Edit Sewing (B-key), hover over the twisted sewing line and reverse the sewing (Ctrl + B), move it back in place and simulate again.

- Finally, adjust the size and shape of the patterns in the 2D window until the clothing approximately fits. You can check the stress level by turning on the strain map (ALT+7). Red spots illustrate where the garment fits too tight and needs further tweaking.
Shortcut Keys:
- Shift Z shows/hides edge lengths in the 2D window, ALT+4 make the cloth transparent in the 3D window
Pro Tip:
With the free sewing tool (M key), select the first part of a seam like you normally do. Before you start selecting the second part of the seam, press and hold the Shift key. When the sewing line turns green, you can start selecting multiple edges of the same or different patterns.
03
How to add details How to add details
In this step, I will show you how to detail the coat and make it look like the reference images. The focus is still more on constructing the garment and less on simulating a certain look. I don't care about styling until all secondary and tertiary elements are in place.
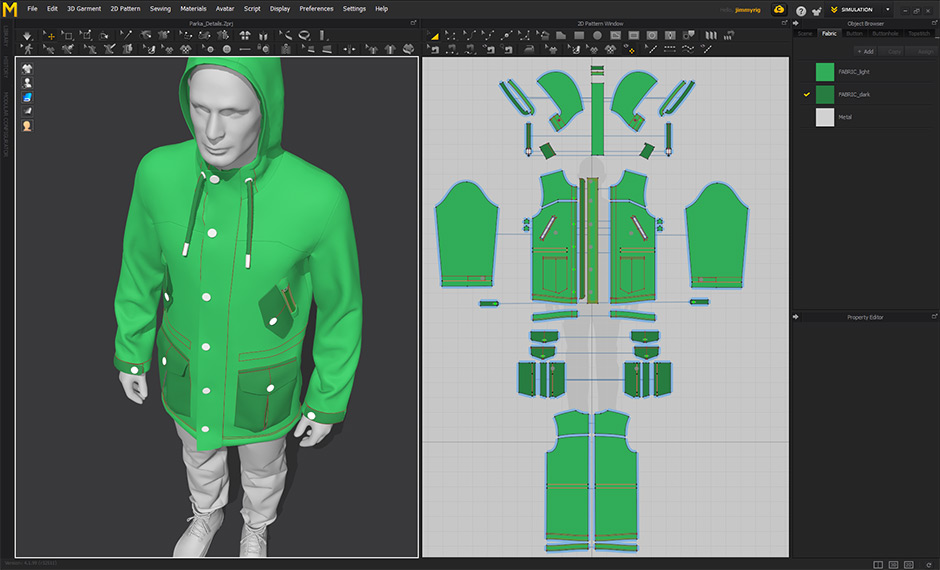
Adding hems
I prefer to add volume to certain edges by strengthening the hems with an extra piece of fabric that I sew on the inside. Watch the demo clip below first and then read the work steps to get a better understanding of the process.
What you need to do:
- To create the hem piece, offset the relating edge as an internal line with "extend" checked. This feature guarantees that the internal line gets extended to the borders of the pattern.
- Next, copy the entire pattern.
- Right-click on the newly created internal line and chose "cut" to separate the stripe. Delete the rest of the pattern.
- Flip the stripe vertically: I do this because I'm going to fold it on the inside in the next step. (This step is not necessary when all lines are straight)
- Then, sew the upper border with the edge of the original pattern and the lower border with the previously created internal line. That attaches the strip on the inside of the main pattern.
- Switch to the edit sewing tool (B key), select the first sewing line and set the values for fold strength to 10 and the fold angle to 100. By adjusting these values, the hem inflates a little and appears thicker.
I then repeated this process for the sleeves and the outline of the hood.
Pro Tip:
If the hem gets distorted during simulation, right click the stripe and select superimpose (under) to tell MD that this piece lies under another pattern.
Adding pockets
Adding pockets to this model is simple and straightforward, as they are literally placed on top of the jacket. One of the garment's more interesting details is the inverted, box-pleats pockets. Let me show you how I made them:
Basically, the procedure is similar to what I have already done to strengthen the hems. In this case though, I haven't adjusted the fold settings manually like I did previously (folds strength and angle set to 10 and 100). Instead, I use the pleats folds tool, which does this automatically. Feel free to take a look at the demo file in the project folder (pockets_blueprint.Zprj)
Pro Tip:
If you are not sure how to approach a certain task, it's best to start with an empty MD scene and experiment with a simple setup to gain a better understanding how things are build.
Buttons and Zippers
In Marvelous Designer, buttons and zippers are elements that help to style the garment; by holding patterns in place or adding functionality to the model. Unfortunately, however, they don't export very well. When you plan to finalize the mesh in another 3D program, be prepared to replace these elements with solid geometry.
Buttons can be used in two ways: to stitch patterns together (that's what they're actually made for) and as design elements. When you take a close look at the coat, you will notice that I've applied them in a different way than intended.
The buttons sit on the big flap that covers the front zipper, whereas the button holes are attached where the buttons should be. Normally, it's exactly the other way around. This allows me to disconnect the buttons from the button holes, but still keep the actual buttons attached to the flap when I open the jacket.
Zippers are nothing else than visual sewing lines and very easy to set up. All you need are two edges that you can connect with each other:
Pro Tip:
Use buttons and zippers sparingly. They can give you a headache during simulation sometimes.
Tertiary design elements
Does it make sense to build tertiary design elements like strings or piping in Marvelous Designer? That's a good question! Even though they look nice in MD, it's not worth the effort most of the time. They not only slow down the simulation process, but you will also probably be much faster at creating these meshes in ZBrush or any other 3D application of your choice, and complementing the garment in a second step.
Anyway, let me show you how I add the hood strings. The process is simple and straightforward:
04
How to style and complete the garment How to style and complete the garment
In this step, I'll show you the tools I use to style the coat and how to adjust the MD properties to simulate complex models.

Creating appealing shapes:
I usually don't start posing the mesh until all elements are in place. Up to now, I have focused only on constructing the clothing and adding details, and not so much the actual look.
What you need know:
- To create interesting shapes, get creative with the garment and make it look like someone actually wears it. For example, you could open zippers to break up the symmetry.
- The more patterns and features your scene contains, the slower simulation will be. For styling purposes, keep the particle distance at 20, or even 25, for all elements.
- For large scenes, consider working on every piece of clothing separately. For example, save different MD scenes for the trousers, coat and shirt.
What you need to do:
- The pin tool is your best friend for styling! While simulation is turned on, add single pins to relevant spots like the sleeves, the front opening of the jacket, or the hood and move them in place.To do this, click on the garment while holding the W–key in the 3D window. This adds a little red marker to the mesh that keeps its position during simulation. Even more, you can grab the marker and move it around. The surrounding fabric will follow. That allows precise styling.

- Sometimes, it even makes sense to import additional avatars the clothing can interact with. To pose the hood, I added a bow-shaped tube and used the track on avatar tool to attach the hood to the tube. When I move and rotate the tube while simulation is active, the entire hood follows.

Simulation settings and physical properties:
I haven't touched any of the simulation or physical properties of the fabric yet. So far, the presets are more than sufficient. Let's take a look at some important settings now:
What you need know:
- If you're already familiar with Marvelous Designer, you'll know that the software is extremely hungry for hardware resources. This makes simulation super tedious for complex scenes. For this reason, make sure you allow MD use of all available CPUs.In the object browser, go to scenes/simulation properties and type in the number of CPUs that should be assigned to Marvelous Designer. Ideally, type in what you have available. The more power, the better!

- For resource-heavy scenes, the only effective way to speed up simulation is to deactivate single patterns. Unlike freezing or hiding, deactivating patterns forces MD to ignore them during simulation. Keep in mind that in a deactivated state, the patterns will not interact with avatars or elements that are activated! The sewing remains valid though.
- When you're done with basic styling, focus on each part of the garment separately. Freeze or deactivate the rest of the model and decrease the particle distance for the piece you're currently working on. Then switch between simulating and adjusting the patterns shapes and properties.When you're happy with the look, freeze or deactivate it and move on to the next piece. For the coat, I started with the main front and back patterns, the pockets, the hood and last but not least, the sleeves.
- Sometimes, you can already achieve great results by simply decreasing the particle distance and applying one of the many different material presets included in the MD library. No crazy adjustments are necessary. Start with an empty scene to test different material properties and to find out what suits best for your project.
What you need to do:
- To add thickness to the fabric, you can instruct MD to lay a copy of the pattern above or below the original pattern. This adds some extra complexity and allows you to adjust the pattern's properties to create more wrinkles. In the 2D window, right-click a pattern and select Layout Clone (Over) or Layer Clone (Under).
- Freeze the underlying pattern, decrease the particle distance of the overlaying one and increase the weft and warp values. If you set these shrinkage values to something higher than 100, the fabric will extend during simulation and this results in more folds. Watch the following clip:
- When you are happy with the garment's drapery, you can right-click an element in the 3D window and select Solidify. This forces MD to keep the current shape of the mesh, even if it's not frozen or deactivated.
- If you want to get rid of most of the folds and bring back some of the original shape of the pattern, right-click an element in the 3D window and select Strengthen (Ctrl+H). Now MD will try to keep as much of the initial volume as possible.

- I used the Demin Raw material for the top layers of the garment in combination with the standard preset material for the layers underneath. Feel free to adjust the physical properties any time to achieve the desired look. Again, it's best to do some tests before you apply the settings in the actual scene to avoid long simulation times.

Pro Tip:
Even if Marvelous Designer's simulation is built on physical properties of the real world, you can override these settings and insert your own values. For instance, go to the simulation settings and set gravity to zero or a positive value and simulate your garment under these conditions!
WARNING!
When you download the project files and open the final MD scene (MD_scenes/04_coat_final.Zprj) do not hit simulate unless your workstation has high processing power. I've decreased the particle distance to a value of 3 for certain parts. That makes simulation super slow and possibly freezes the application.
Conclusion
I hope this tutorial gave you some insights into my workflow and inspires you to create your own amazing clothing with Marvelous Designer.
Keep in mind that we're only halfway through the entire process of finalizing the garment and making it ready for production. In the next part of this tutorial, I will show you how to export clothing from Marvelous Designer, quickly retopologize the mesh, and add details in ZBrush.
Go to the top of this page, and subscribe to download the project files and to be notified when new content is available. If you have any further questions, please feel free to leave a comment below. I will try to answer every query as quickly as possible!
how to make a line pattern in marvelous designer
Source: https://3dgladiator.com/tutorials/marvelousdesigner/